


Sorry I took so long to give you instructions on the M&M cake. I wish I would have taken pictures but it is rather easy.
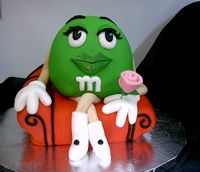
For the body, I used an egg pan but had to cut it because I realized she is not an almond shaped M&M. You could likely use the 3-D ball pan because it is already round. M&M's although round, are a little more flat in the front and back.
Ok.., so I baked the cake and had two pieces which have the seam going vertical. Put one cake on top of the other and trim slightly on one end to make a flat base so it will sit better. Just use an icing that has a firm consistency to use between which will stick the two halves together. Set the cake upright on the flat end and ice the entire thing. I put it in the freezer at this point to get really firm. When you take it out of the freezer to work the fondant over it, allow the condensation to come out a little as this moisture will of course help your fondant adhere. I used green fondant to cover her and you can trim off excess and tuck under her to give a more rounded appearance. Use your fondant smoother to smooth out any finger prints immediately before it dries as you will have to hold the cake in your hand to finish tucking the fondant toward the bottom. Ok....just put her aside now until you've got the other pieces done.
For the arm chair, I used rice crispy treats. I guess you can use cake but I wanted to try this method and figured it would have good support for the M&M...which it did. I had no dowel running between the M&M and the chair, it didn't need it and I drove to my destination with it without having any problems.
You will have to make a fresh batch of crispy treats for the chair as the stickiness allows you to form it. (You could use twinkies for the arms of the chair I suppose). Make sure you have enough marshmellow for the crispy treats so it's nice and sticky. Form the chair as you like and allow it to set up a bit. One it sets up and you feel it's firm, you can put a coat of buttercream over it and freeze it for a short time to firm it up. Once you take it out, you can cover it with fondant either by sections, i.e., the arms, the back part and then the seat. Cover the seams with black piped icing or by using black fondant rolled out thinly.
Now....make the leg parts and sit them where you want them on the chair. I pinched the fondant a little at the knees to give her knee caps. For the boots, I used white fondant and formed it around the bottom of the leg and put a little piece on top to look like a buckle. No place the green M&M on top if the legs. Form your arms and attach them to her from the sides. For the hands, I flattened the end where the hands will be so I can attach the hands right on top. The hands are just balls of fondant, cut down in the front to give her fingers...notice, she does not have five. Then place that on the flattened part of the fondant arm. roll out a sausage piece of white to go around the back of the glove as the cuff of the glove.......Ok...you are almost there, she's coming together.
No, the face parts. I used Wilton's oval cutters for her eyes. Take white fondant and roll it out place a piece of plastic wrap on top of the fondant and use the cutter pressing the plastic wrap and the fondant. This will give it a rounded effect to the eye. Attach to her face. Use the smaller one for the black part of the eye and attach it. Then, use green rolled out flat, no plastic wrap and use the same oval that you used for the white of the eye. Cut it in half and place it on the eye for the lid.
The eye lashes are black rolled out to little thin spaghetti sized pieces and placed along the lid. The eye brows are black rolled out like a sausage and tappered at one end. Then flatten the inner part of the brow a little then place it where you want.
The lips were done freehand in a little bit of a darker green than the M&M and attached then brushed lightly with confectioner's glaze for the glossy effect.
Best of luck with this project. I'm sorry the instructions were so long. Let me know if you have any questions or need help. ;o)


Thnak you for taking the time to give us the instructions!!
I love this cake! 
![]()


Thank you so much for taking the time to write out those instructions. Awesome cake!!!!!

Thanks for sharing your technique, this cake is very cool! ![]() Great job!
Great job!
Quote by @%username% on %date%
%body%