


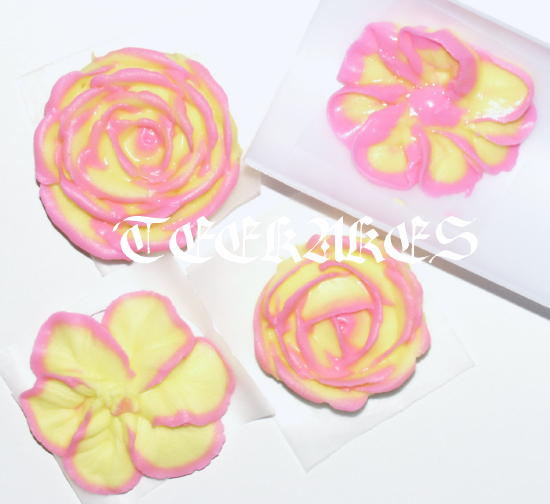
I love playing around in the kitchen and discovering things. The other day I wanted to make two-toned flowers but didn't want to use the method of putting a food coloring stripe inside the bag because sometimes the stripe comes out looking streaky or incomplete in the flower and I want them to look perfect, as if the stipe is actually part of the flower just like they look in our flower gardens. So, I saw my foodsaver sitting on the counter and had an idea to turn one piping bag into two piping bags yet still be one bag. The results are in the pictures below and I am working on a Tutorial to show you exactly how to do this fun and easy technique. I'll have it up on CC this morning or early afternoon. ![]()
What do you think about it?
I don't have a food saver but I tried this with plastic wrap. Would love to see your tutorial, then maybe I'll get a food saver. I don't mind the striping the bag method but the stripe is usually different on each petal.

Hmm...I have a food saver! Very interesting idea! I'll be reading the tutorial and trying this out! Thanks for sharing ![]()
Well, I can't find the link on how to create a new Tutorial so am waiting for Jackie or Heath to lead me the way.
In the meantime I am going to go ahead and show you a couple more photos of my technique. When I get the tutorial done I'll take these pictures out of this post so they won't be taking up to much storage space.
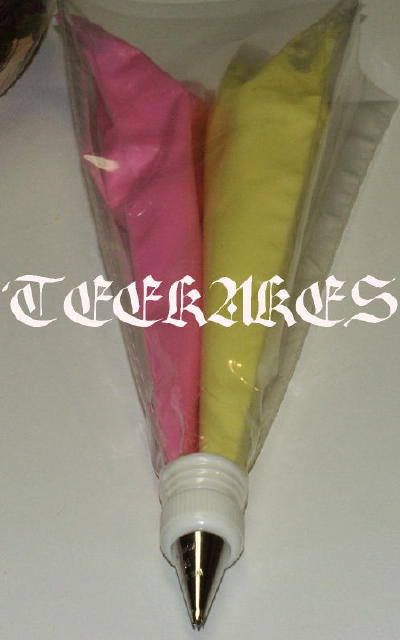
I first sealed a disposable icing bag right down the middle. I then filled one side with pink and the other with yellow. If you notice in the picture I cut the tip smaller for the pink because I wanted the pink to be the thin stripe. Then I placed my dual icing filled bag into another bag and started making my flowers and circles and lines and everything else I could make! It was fast fun and easy!
For some reason I am only able to put two photos in this post so will submit this one and continue in another one with the third photo showing the dual icing bag placed inside a tip and coupler fitted icing bag.


Here is the Dual bag filled and placed into another bag ready to go to work!
Hmmmmm, the picture did not show up. Hopefully I will hear from Jackie or Heath soon so I can get the complete Tutorial up for you all. It works awesome!
Here we go! Got the picture to load finally.

That's great! I have a food saver that I used I think the day I bought and that's it!!! What a great excuse to put it back on the counter!! I just bought the dual bags because they were cool - haven't tried them yet!!
~Chelle


ISN'T IT CRAZY HOW YOU CAN BE LOOKING AROUND THE HOUSE, SEE AN ITEM AND TURN IT INTO SOMETHING TO DO WITH CAKE DECORATING  . THIS IS A NEAT IDEA, I HAVE A FOOD SAVER AND NOT ONCE DID I THINK OF USING THE BAGS FOR DECORATING, WILL CERTAINLY HAVE TO TRY IT OUT
 ![]()
That's great! I have a food saver that I used I think the day I bought and that's it!!! What a great excuse to put it back on the counter!! I just bought the dual bags because they were cool - haven't tried them yet!!
~Chelle
My Food Saver is getting quite the workout now that I have discovered what I can do with disposable icing bags! Plus I am making my own custom sized icing bags out of my food saver rolls of bags too! Try it out and you will see.
With the food saver you can make one side of your bag smaller than the other if you are wanting a lot of one color and just a little of another. Plus, the bags are washable and reusable so no wast there. If a seam comes apart........simply seal it back together with your food saver!
Here is what I am doing with my bags of Buttercream and Royal Icing. As soon as I load the bags up with icing I seal them with my Food Saver. This keeps the icing air tight and there is NO MESS with icing coming out of the top of your bag, ever. To seal it completely I use a small piece of saran wrap rubber banded over the tip. Before using the icing again it is easy to knead the icing right in the bag and never worry about it squishing out the top of the bag. The saran wrapped tip keeps the icing from coming out at that end.


As I mentioned before I don't have a food saver (had one but sold it at a yard sale a couple of years ago, hung on to it forever and decided it was time to get ride of it) but I do have a "EuroSealer" (handheld sealer). Does the same thing as the food saver, so I tried it on a disposable bag. Teekakes, Thanks for the tip. I still plan on checking out your tutorial.
I just submitted the Tutorial to Heath and Jackie so it should be posted in the tutorials section soon.
There is so much I am doing with this method! It is a lot of fun and there seems to be endless new perfect pretties with the different tips. I'll post more pictures of different tips being used as I get them done. If you decide to try this please post your pictures too! ![]()


I have a food saver and would NEVER have thought of this!! What a great idea..ASide of this trick do you prefer the plastic bag over the nylon bags for any specific reason?

omg! thank you so much for thinking of this.... i have a foodsaver and absolutely love it... now I have another reason to love it even more...
ok, now when you say you sealed the bags are you talking about the foodsaver bags or the disposal bags for icing?


I'll throw out another use for this--how about pre-colored sealed bags of piping gel? KopyKake sells it, but it's pricey and has colors that I'm not sure I'd use. I really hate to color the stuff as I need it--it's sooo messy.
You could make a project of making up some small bags and then you'd have them as you need them.
Just my .02
Rae
I have a food saver and would NEVER have thought of this!! What a great idea..ASide of this trick do you prefer the plastic bag over the nylon bags for any specific reason?
Only because they are convenient and they are reusable for a few times. ![]()
omg! thank you so much for thinking of this.... i have a foodsaver and absolutely love it... now I have another reason to love it even more...
ok, now when you say you sealed the bags are you talking about the foodsaver bags or the disposal bags for icing?
The disposable bags. However, the foodsaver bags will work the same way no doubt. ![]()
great idea
(and I've bought the commerical ones -- very big, over 18", and very thick and hard to handle.)
this looks so much easier...
of course this means I have to buy a food saver now!
Geee, is that so bad Doug!? LOL..........I love buying new kitchen items! ![]()
For whatever it is worth, I bought the FoodSaver Professional III because you have manual control for sealing things like CAKE, doughnuts and other soft items without squishing them. I vacuum seal cake in foodsaver bags then freeze them and the cake is good 2 months later.
I'll throw out another use for this--how about pre-colored sealed bags of ? KopyKake sells it, but it's pricey and has colors that I'm not sure I'd use. I really hate to color the stuff as I need it--it's sooo messy.
You could make a project of making up some small bags and then you'd have them as you need them.
Just my .02
Rae
Absolutely, Rae! That is what I am doing with Royal Icing of different thicknesses. The color flow I sealed up stayed just as thin as when I first put it in the bag.

Quote by @%username% on %date%
%body%